1

A bright pick me up

Hello crafty friends,

I imagine that all of you, like myself are feeling the weight of the world’s trauma during this time. I desperately needed a distraction from the pain and sorrow, if only to feel happiness for a little while. Crafting has definitely filled an emptiness for me these past few months as well as being a much needed distraction. I can easily get lost in experimenting and trying new techniques.

As I mentioned in previous posts, I have been trying to push outside my comfort zone. I am trying to approach each new creation with the intent of trying something new or doing something differently than what I would normally do. The inspiration for this card came from the “Shake the Rainbow” Sparkle Blends from Doodles Paper Playground. That Blend led me to purchase the PI Color My World stamp set from MFT with which I am truly obsessed. This was one of those sets that as soon as I laid eyes on it, I had a ton of ideas. Even just writing about it I am thinking of more things to do with her.

Once I started thinking about rainbow colors and her paint palette, I instantly thought of color bursts. I love playing with these and I knew this card would create a perfect canvas for them. The Sparkle Blends were bursting with color and I knew the card had to “burst” just the same. I chose to color the girl in greyscale as a metaphor to the sentiment and to contrast all the bright colors from the color bursts and the Sparkle Blends. I wanted it to look like the colors were bursting out of her brush so I painted just water across the paper coming out of the brush. Next I sprinkled on my colors one by one, then spritzed it with more water. I dabbed any puddles with a paper towel.

I had to build the shaker element pretty deep to allow the blends to move. Keep that in mind when using shaker materials with big pieces. The hearts are thick and I didn’t want them to get stuck so I built this shaker using three layers of chipboard. If you look down at the inside bottom edge you can see the stacked chipboard. I like using this method when I can because I feel I have more control over my shaker. Another reason is there is no chance my shaker pieces will stick around the edges. Sometimes with foam tape (or squares or dots) there is stickiness on the edges that the sequins will stick to. However, the number one reason I prefer using chipboard when possible – no little paper backing pieces to peel off!

I embossed the black frame after I die cut it with an old embossing folder from Darice. The cardstock and markers are from Stampin’ Up and I used my favorite black ink from Picket Fence Studios. I definitely have some more ideas for using color bursts so stay tuned! Leave a message and let me know if you were “sweetly inkspired.” Thanks for stopping by.

2

Bananas for Blends

It’s probably a good thing my husband doesn’t read this blog. I would like to admit that I am so easily enabled by a good sale. I see any number followed by “…% OFF” and I am opening a new browser window. And forget if I see “FREE SHIPPING.” Then it’s time to text my friends. As well as “FREE SHIPPING ON ORDERS OF $50 OR MORE,” because then I need my friends to get in on the order so I can buy more stuff and not feel guilty. You know who you are.

So, recently I got to play with some new sets that came in the mail from aforementioned situations. Many of these new purchases…uh, I mean products, were strongly influenced by DPP’s new May release Sparkle Blends. These monkeys came from MFT’s BB Picture Perfect. This is definitely one of those sets that make you feel like you got a bang for your buck. Which I definitely did since I shopped a good sale. The set is 6″ X 8,” so these stamps are all a good size to color, not to mention so adorable. When I saw this set, I know it was a perfect pair for DPP’s Monkey Business Sparkle Blends.

I set a goal for all the recent purchases. Most likely to lessen the guilt of spending money. I wanted to make fresh, new card designs. I’ve been trying to push my design limits lately. This is a form of therapy for me. I like to challenge myself to break out of my own style and push my limits. This is like prep work for my professional design and will hopefully give me the confidence to push myself further when designing professionally.

As dramatic as that sounds, I started with something small. Simply put, size. I rarely, if ever stray from the standard 4.25″ X 5.5″ standard A6 card size. The reason being envelopes, sort of. All my cards are made with the intent of being given away. Sometimes I have a specific person or occasion in mind and sometimes I don’t. Sometimes I feel like a nut, and most times I am. How will I mail a card that doesn’t fit in one of those 250 A6 envelopes I have sitting in my closet? I need it to fit in one of those envelopes so I can mail it to someone.

I went a little ape…well, you know. (Gotta love monkey puns.) I made it square. However, I did not make that decision before I made sure there was a variety of square sizes on my envelope punch board. This card is 5″ X 5″. Next time I think I’d like to go bigger (again, size). Cardstock, banana paper and alcohol markers I colored with are all from Stampin’ Up. The brown ink I used to stamp is Catherine Pooler’s Icing on the Cake. If you ask anyone at My Little Scrapbook Store, they will attest to this. Even if you don’t ask them, you should check them out for their live scrapbook and paper crafting sales (Yup, you can watch and shop in bed!) and Bingo nights. Yes, that’s right – live, online Bingo every Friday. Prizes are your choice of amazon or My Little Scrapbook Store gift cards, so the whole family can play. Tell them Gina C. sent you. You’re welcome.

Back to our regularly programmed craftiness. I blocked the center of this shaker so the Blends traveled around the center monkey image instead of falling behind it. The Monkey Business Blends are too cute to hide. I mean c’mon, it has banana slices. Take a look.

0

Mini Album Madness – Take 2

As promised in my last post, today I am sharing the 6″ X 6″ twine bound mini album I learned from Lyric Lover Crafts. This book was created for another very special person – my friend, co-worker and best scrapping buddy, Dee. Dee celebrated her 60th birthday quarantine style complete with a police escorted drive by. And, as I mentioned in my last post, what better time to make a homemade gift then during a pandemic? And who better to make it for than someone who you know will appreciate it?

Aside from crafting, one of Dee’s biggest hobbies is gardening. So, flowers were a no brainer for the book. I used the “Celebrate the Little Things” collection pack by Becki Adams. This is a very unique set with a bright, beautiful color pallet. If you can’t already tell, I am obsessed with color and color combinations. I love anything unique and unsuspected. Which is basically the opposite of my own style of designing in my professional career. I tend to have a cleaner, sleeker, more organized style of design. Some may say OCD. But once again, I don’t know who. The rest of the embellishments, ribbon and twine were from Stampin’ Up, except the epoxy shapes and the stickers and tags on the inside pages which came with the collection pack.

Again, I used up almost an entire paper pack, but this time I did not need to fill in with any extra pages. I got two folded pages from each 12″ X 12″ sheet. I cut them slightly smaller then the cover which was 6″ X 6″. Each inside sheet measured 11.75″ X 5.75″. Once folded in half and placed inside the book, this allowed the pages to fit neatly within the cover. I would still like to make the changes I mentioned in the last post (smaller spine, inserting pages as you wrap the twine). However, this size album was definitely more manageable and provided a more efficient use of supplies. Not that any of us are lacking on supplies, right? But we all know, the more you use, the more you can buy.

0

Mini Album Madness

What do you do when you need a birthday gift during a pandemic lockdown and amazon is being completely unreliable? What if the recipients are very close friends whom you know will appreciate something home made? What if you just happen to have a ton of craft supplies? If you’re still scratching your head, then you need to move along! Unless, of course your head is just itchy. If you know the answer (or you know me) then please continue…

If you are me, you pull out some supplies and thank your friend Donna for introducing you to an online tutorial for making easy mini albums using twine binding. You also thank her for turning you onto your new favorite YouTube Channel. Thank you, Donna. I’ve spent several hours with Lyric Lover Crafts over the past 2 weeks. Well, several hours watching her videos but we’re totally friends in my head!

Below is my first twine binding mini album made for my friend Tammy. She is a hunter, fisherman (fisherwoman?), loves the outdoors and is truly one of my favorite people on the planet. So Photoplay’s Lakeside by Becky Fleck was perfect for her book. I did have to fill in with a few sheets of cardstock and miscellaneous pattern paper. I used a few sheets of Chatterbox paper. Chatterbox was one of the first companies I fell in love with some 20 years ago when I first started scrapbooking. Yes, I still have paper from 20 years but I used it – so no judgement! The wood embellishments, leaf die cuts, twine, pinecone charms, lace trim and epoxy shapes on the inside pages are all from Stampin’ Up. The blue enamel dots on the cover were made with Nuvo’s Midnight Blue Crystal Drops. I also used Mahogany Powederpuff ink from Quick Quotes with Life Changing Blender brushes from Picket Fence Studio to ink the edges.

I should warn you that making these are addicting. Plus you can easily use up an entire paper pack which makes me feel less guilty about how much I’ve spent on craft supplies in the last few weeks…months…ok, years. This book is 6″ X 8″ so I only got one folded 12″ X 8″ page per 12″ X 12″ sheet. As you will see in my next post (to come) making the book 6″ X 6″ allowed me to get 2 pages out of one 12″ X 12″ sheet. The Lakeside book has 20 folded sheets making 80 pages. In the future I will make the spine smaller and put in less sheets. 80 is a lot to fill, unless it’s for a baby gift or wedding.

Another change I would suggest is how the pages were put in. You will see in the video, after the cover is made, the twine gets wrapped around the spine 20 times. Then each folded piece gets slid under a strand of twine on the inside. (This will make sense if you watch the video around 28:00.) Once you have a few pages in, it gets harder and harder to slide them in and pages can easily get ripped or bent. Next time I am going to try laying a page in then wrapping the twine over it, laying the next page, wrapping again and wrapping each page one by one. I will let you know how it turns out. In the meantime, here are some photos of the Lakeside book. Please check back tomorrow when I share a 6″ X 6″ twine bound book. Thanks for looking!

10

You scream, I scream, we all scream for…COFFEE!

A few months ago I finally tried my hand at no line coloring. I grabbed my ZIG Clean Color markers and started off with two little caffeine loving cuties from The Greeting Farm. Meet my friends Latte Anya and Cafe Ian. Now, since I am a hoarder of all things crafty and cute, I had this amazing paper from ColorPlay called “The Daily Grind by Becky Fleck.” As soon as I started playing, I quickly had buyer’s remorse. I SHOULD HAVE BOUGHT MORE!!! Ugh, so cute.

Anyway, when I found out about the blog hop over at Coffee Loving Cardmakers, I knew it was time to give these two a home.
undefined

So I grabbed my scissors and begun fussy cutting away. Once Anya & Ian were ready to go, I tore through all my “coffee themed” supplies to figure out what was next. Since I was in the mood to make a shaker, I grabbed “Breakfast at Tiffy’s” Sparkle Blends from Doodles Paper Playground. The colors worked perfect with what I had going so far. I have a feeling this color palette will show up again in a future design. I chose a sentiment from a retired Stampin’ Up set called Coffee Cafe. This is one of those sets that I tend to use a lot. If you followed along for DPP’s May release Blog Hop, you saw I used it with the new Spill the Bubble Tea Sparkle Blends. All the cardstock and metallic thread are from Stampin’ Up and fine white embossing powder is from Ranger. As you can see, I sometimes get a little obsessed with shimmer and bling. Some may say a little too much. I don’t know who though. What do you think?

0

Manic Monday

Hey crafty kids, Happy Monday! Why am I happy this Monday, you ask? It’s a 4 day week! Kids are off on Friday & Memorial Day! So this 4 day week is followed by a 4 day weekend! That means 4 straight days of not having to fight with kids to do schoolwork! Woot Woot! I am hoping to spend lots of time playing with all my “Covid Christmas” purchases! I am so excited to play with new stamps from Kindred Stamps, The Rabbit Hole (which I bought from Kat Scrappiness), MFT and most of all my new Sparkle Blends from DPP! I haven’t gotten them yet (or I would have definitely posted pics!) but all the new deliciousness is on it’s way and I will be stalking the mailman!

So it was my dad’s 75th birthday. He is one of those guys that truly deserves the world. He is simple, kind and generous to say the least. As usual, I always seem to find something from Kindred Stamps, to fit just about anyone. This little guy was perfect to celebrate my dad. I wasn’t sure I was going to like him in black white, but aside from how much fun I had coloring him, I am really happy with how he turned out. I used papers and alcohol markers from Stampin’ Up, my favorite black ink from Picket Fence Studios, “Golden Age” stamp set from Kindred Stamps and added a pop of color with Intergalactic Sparkle Blends from DPP. This was a quick and easy make, but I had fun with it. Thanks for checking it out! Please come back and visit soon as I’ll be posting many new creations as the packages arrive!

IMG_7721

16

May 2020 Sparkle Blends Release Blog Hop

BlogHop
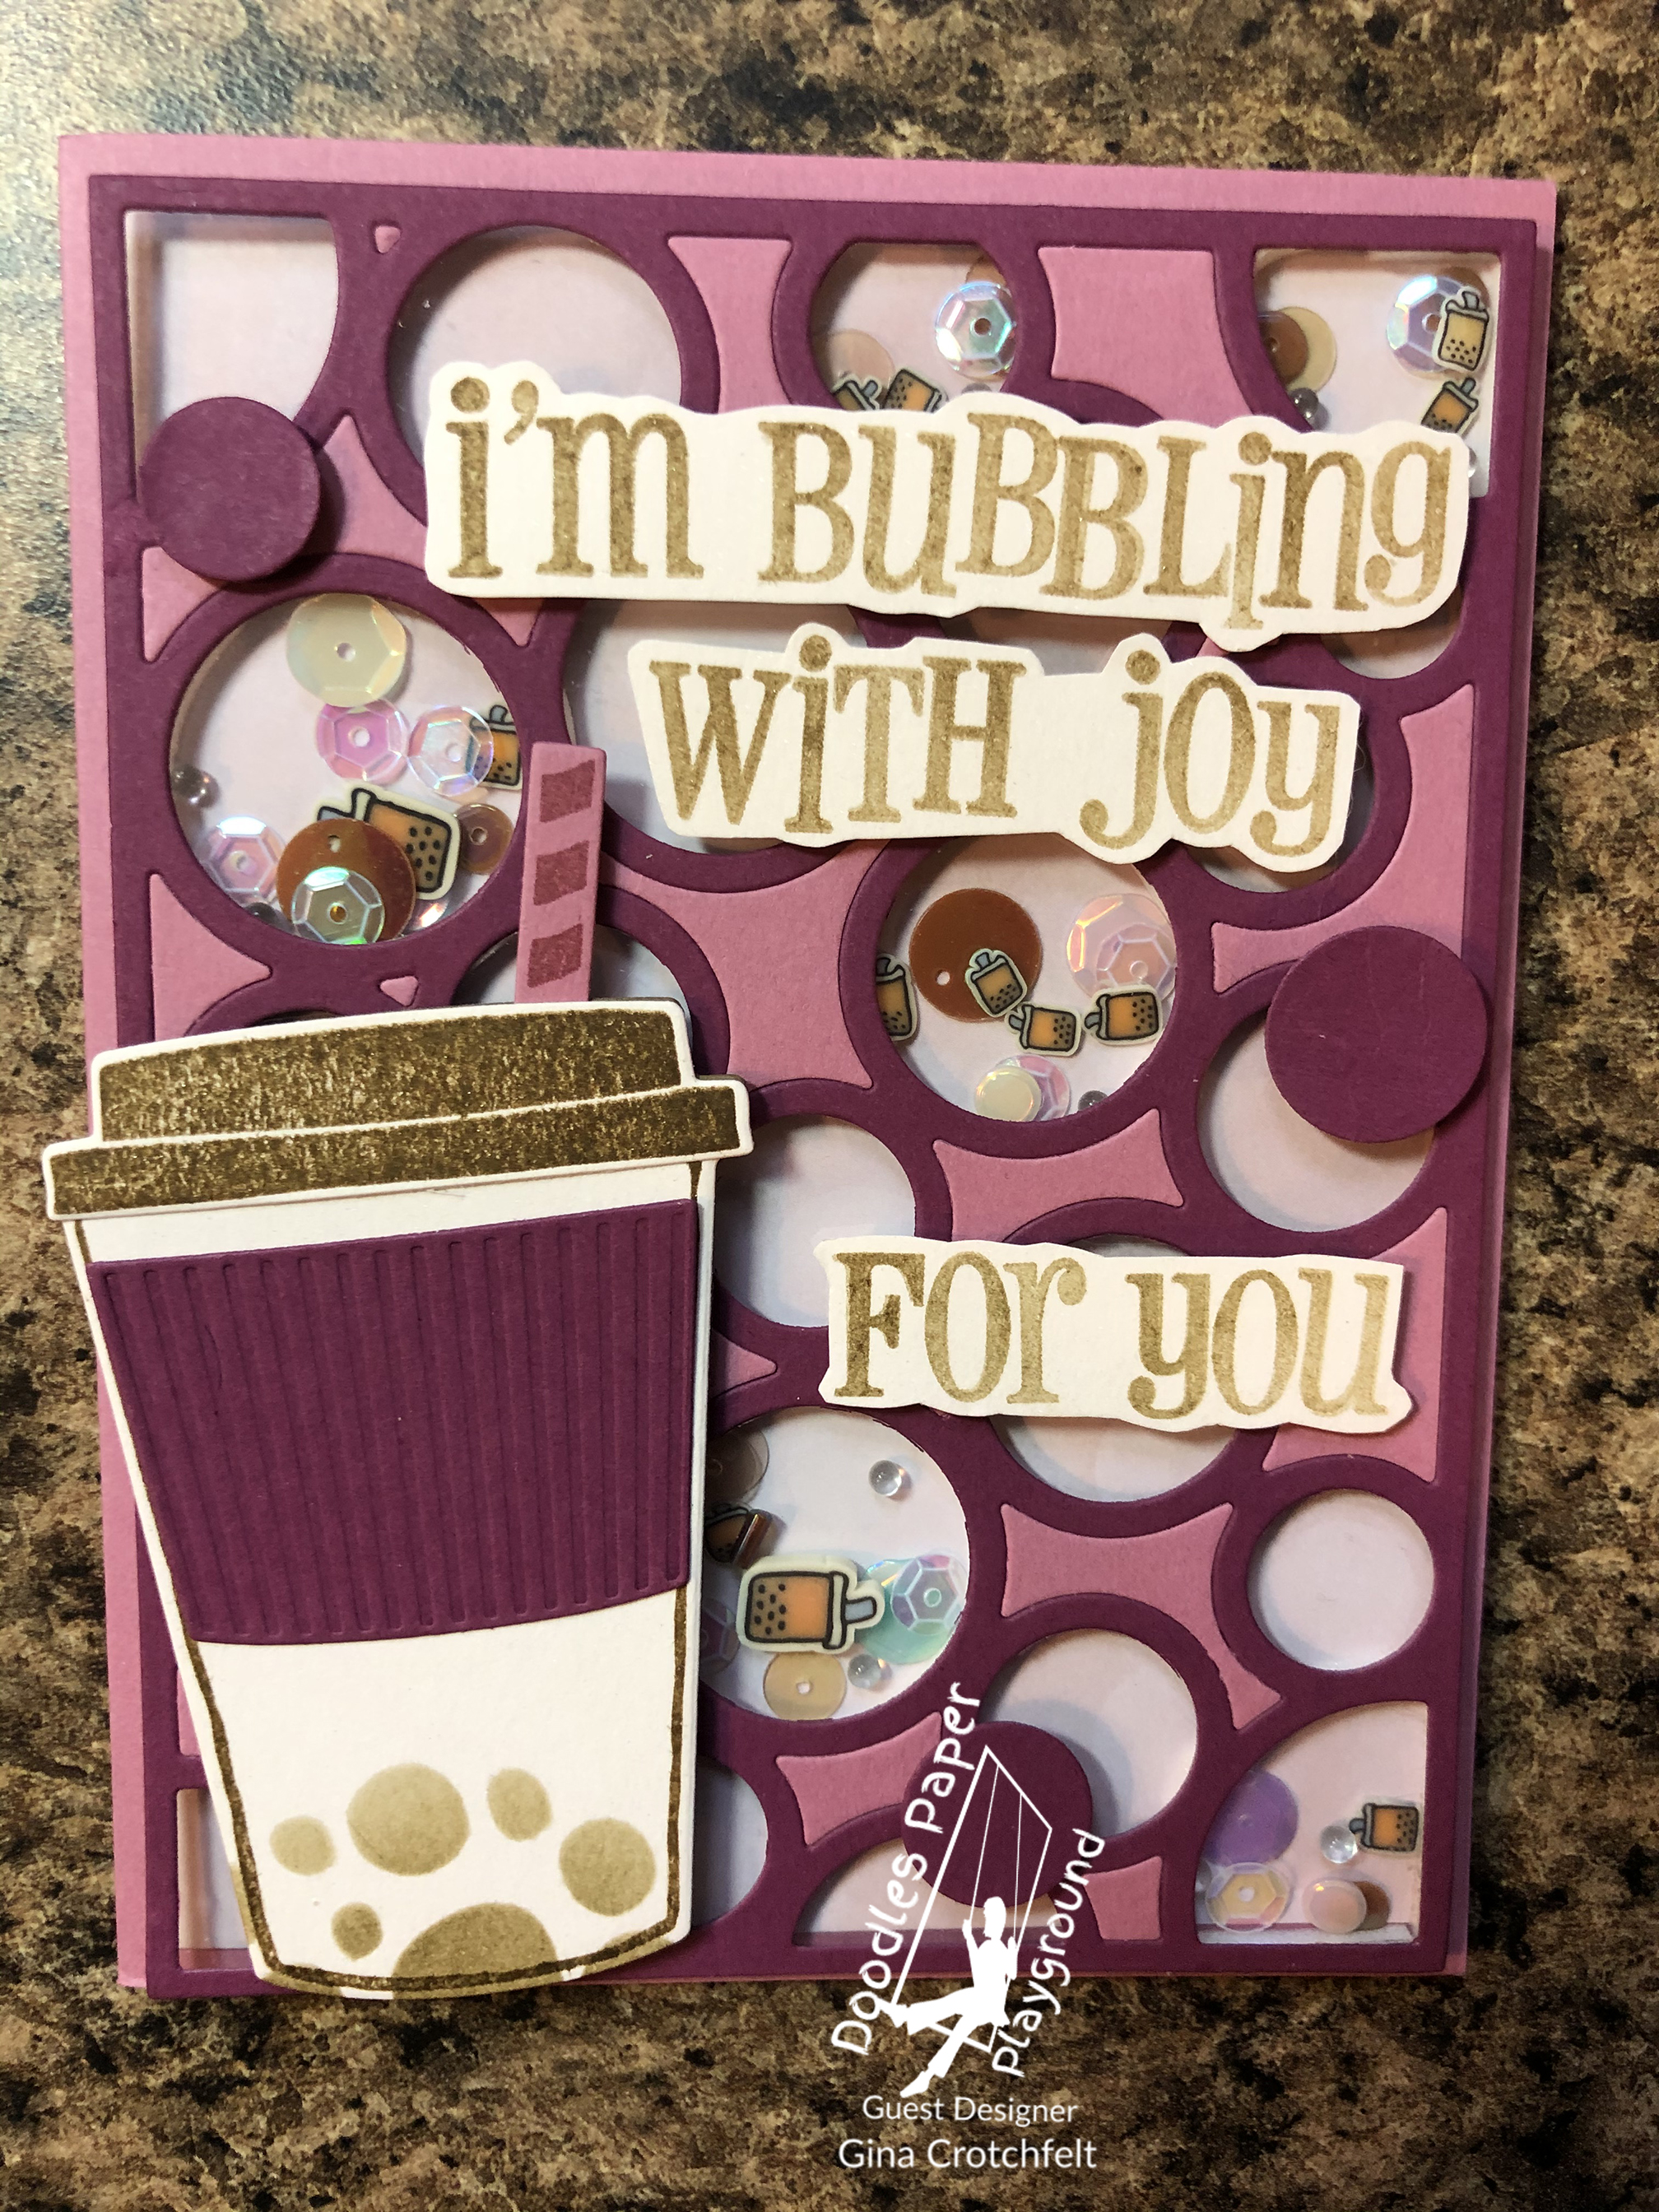
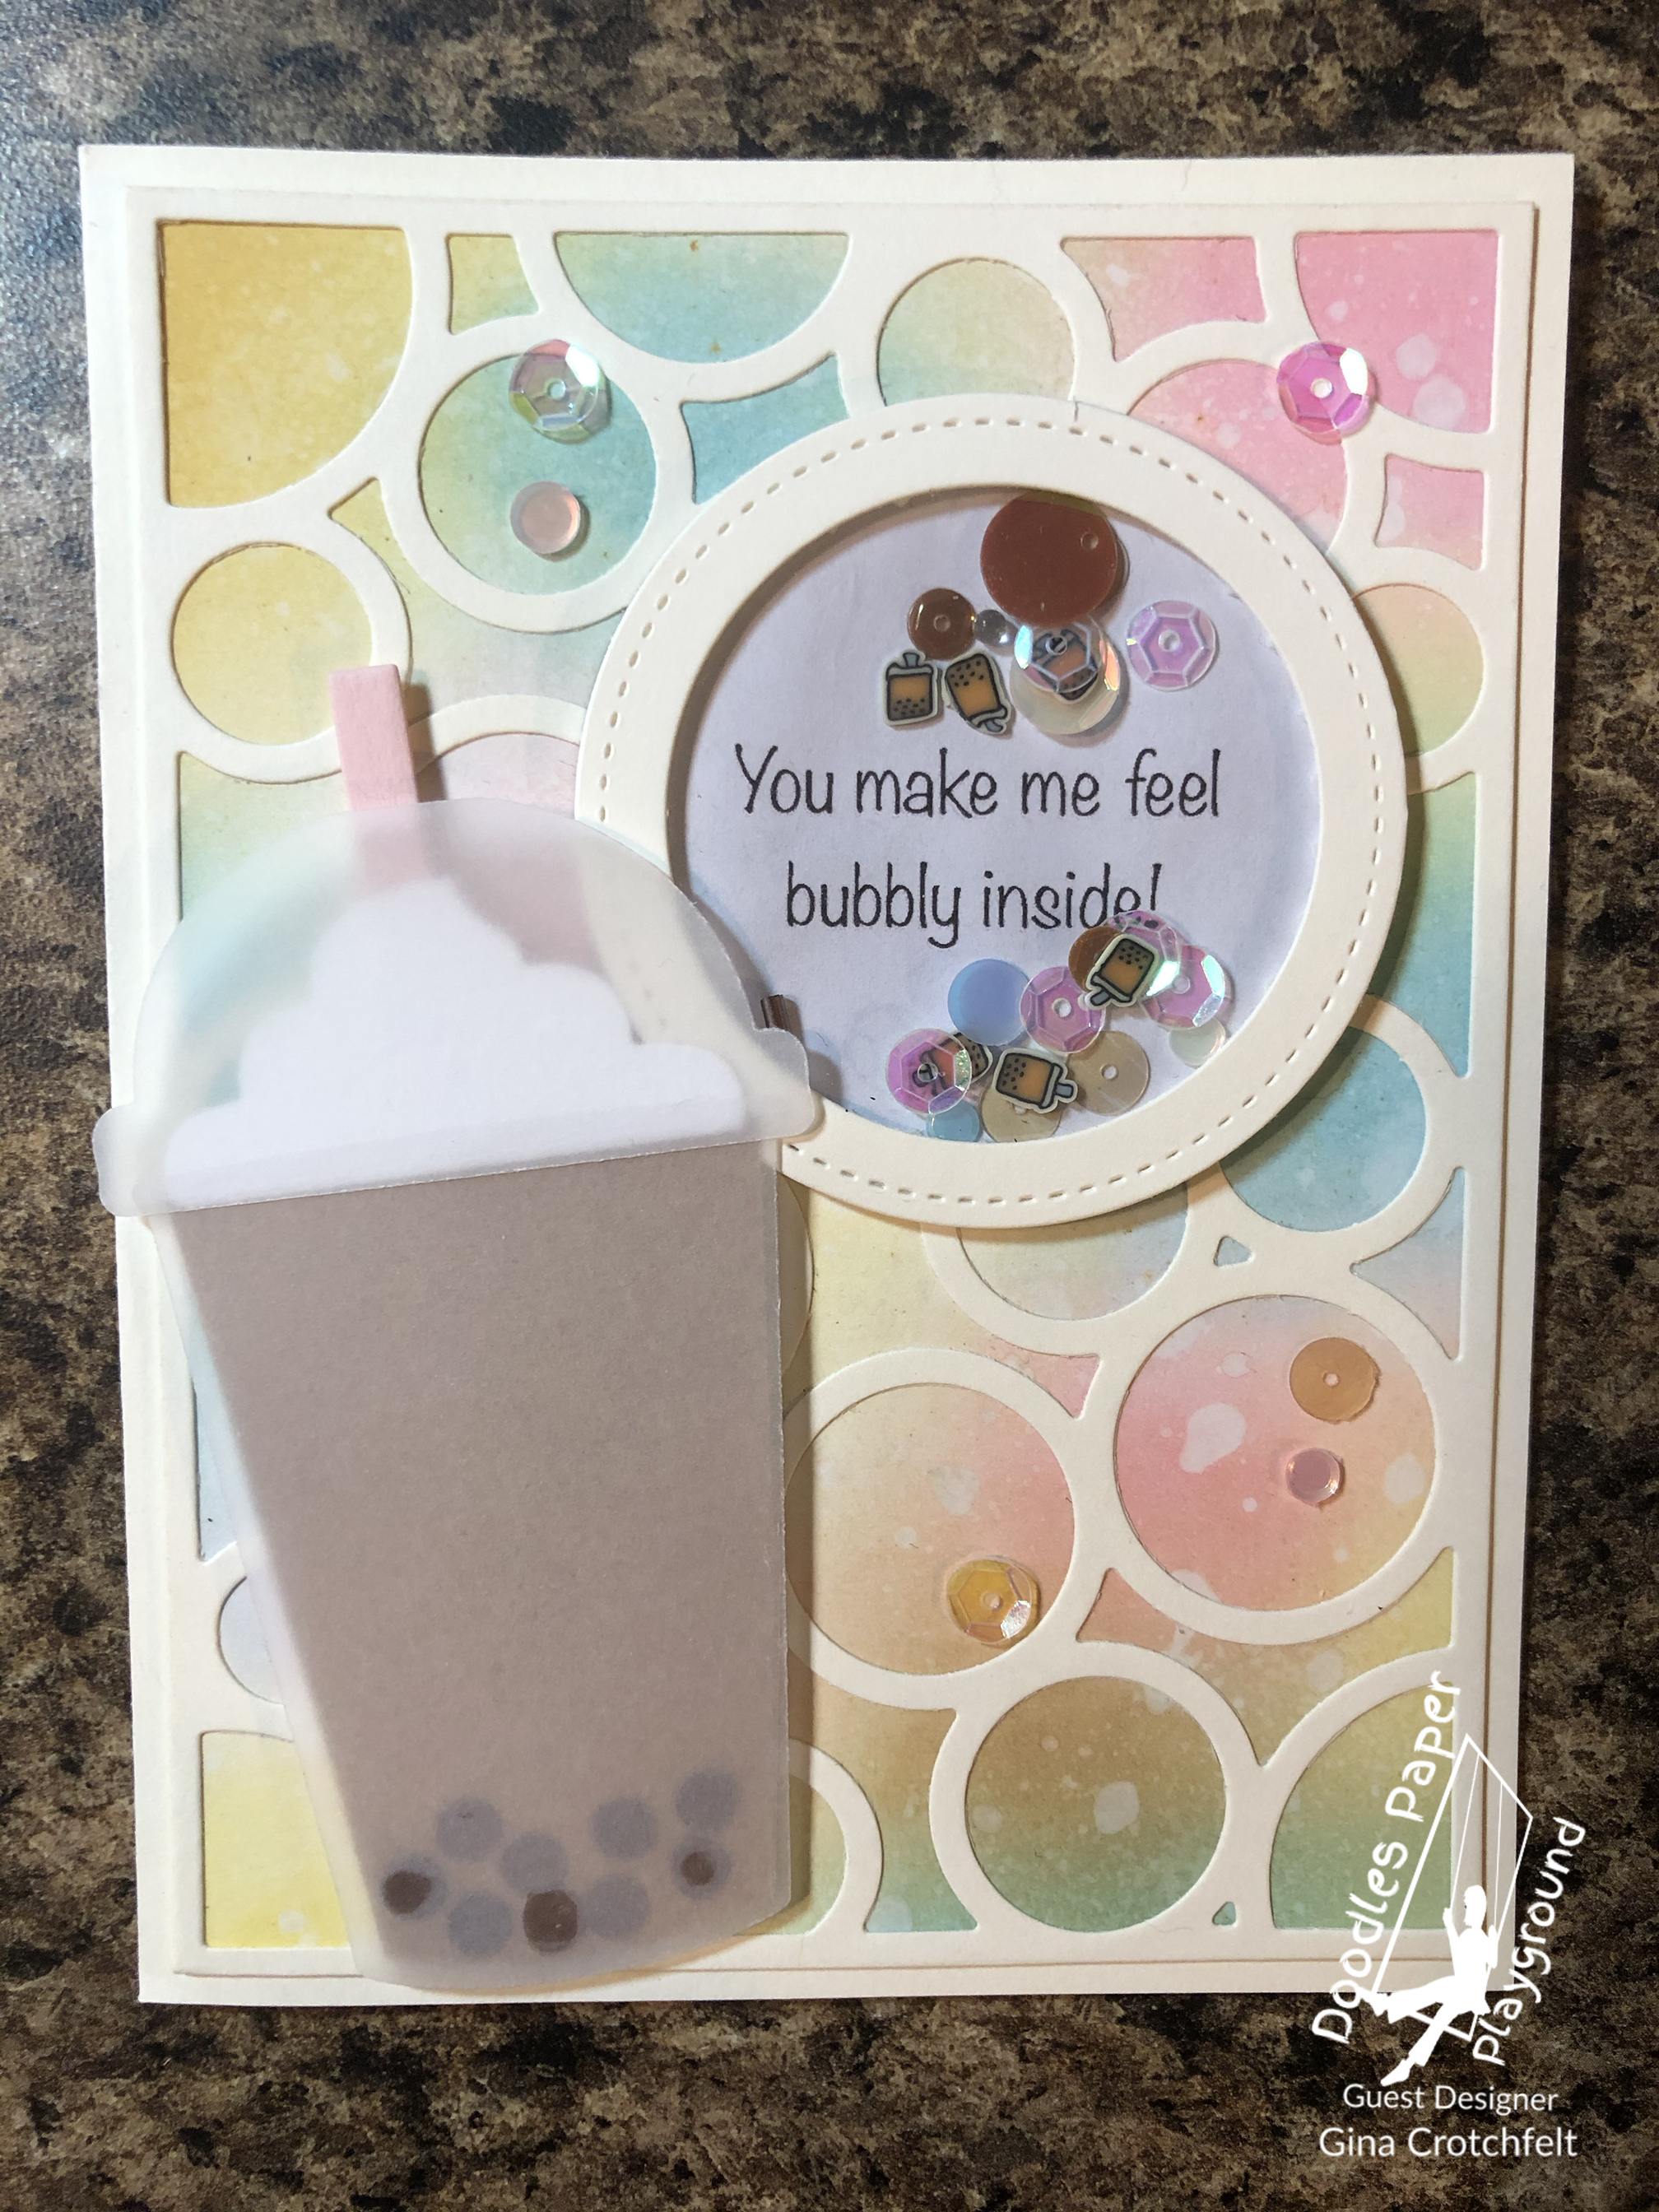
Hello Sparkle Blends Fans! Its time for our May Release Blog Hop! We’ve got a fantastic lineup of Blends this month & the design team & I have created some awesome inspiration projects featuring some of the 7 new Sparkle Blends in this release! As if that weren’t enough, we are offering you the chance to win 3 fantastic prize bundles!
See the Doodles Paper Playground Hop Post for giveaway prizes and entry details. Comments must be posted no later than 11:59pm EST on Sunday, May 17th, 2020 to be eligible to win. Open to US residents only who are at least 18 years old. Winners will be drawn Monday, February 18th & posted on the Doodles Paper Playground blog, Facebook page and in the Sparkle Blends Fan Club on Facebook.
As an added bonus, we’re offering you a little bit of Blog Candy, in the form of a Discount Code worth 15% off your total order!
Use Coupon Code: MAY15OFF (excludes May Release Bundle)
💎💎💎💎💎💎💎
Hop along with us!
I had so much fun creating with the new blends. So many yummy ideas bubbled up! The first one uses “Orange Creamsicle, a fun, summery blend featuring a cool treat! Aside from the Sparkle Blends, all other materials on this card are from Stampin’ Up.
01
Next up is “Spill the Bubble Tea.” This blend is full of bubbly fun! It lends itself to a variety of color palettes because of the iridescent sequins. And the little bubble teas are adorable! I had fun trying out different combos. The first one I did used a darker color combo. Paper, inks, stamps and dies are from Stampin’ Up except for bubble background die from Elizabeth Crafts.
02
This next one uses a lot of the same elements as above except I went in a different direction with the colors. For starters, I created a “bubbly” background using Distress Oxide inks in Wild Honey, Broken China and Worn Lipstick. I love playing with these inks. It’s easy to create so many different looks with blending and water splatters.

It layered perfectly under the bubble die background and I am really happy with how well it went with the colors in the Sparkle Blends.

03
Thanks so much for stopping by to take a peek at my creations! Don’t forget to visit the other blogs and stop by the Doodles Paper Playground blog to comment and enter to win some awesome prizes!!
0

I get by with a little help…

…from some amazing, sparkly friends! And get ready because I’m about to enable you! Before I talk about the card, I have so much amazing news! First up, the new Sparkle Blends are now available in the Doodles Paper Playground Etsy shop. What’s awesome this month…there is a new release bundle! This is awesome for so many reasons: 1. You get ALL the new blends. 2. You get them at a discount. 3. It comes with a free gift. What more could you ask for! Order soon because these bundles won’t last.

Ok, I know you thought that was the exciting part but it’s really not. Drumroll please…DPP has asked me to be part of their May release blog hop! I could not be more excited! So make sure to check in beginning 9am on May 15. There will be gorgeous projects using the new blends and prizes! Yay for free stuff! Stay tuned for more info coming soon.

Now for the card:

After I finished working on some other top secret projects, (don’t I sound mysterious?) I used my leftovers for this birthday card. I always like to have extra cards on hand just in case. The paper, silver thread, ribbon and square die are from Stampin’ Up. The lighter cardstock is one of my favorite retired colors called Sweet Sugar Plum. The circle die is from Elizabeth Crafts, and the “Let’s Celebrate” die was a freebie I received in one of my past Sparkle Blends order. It’s from Simon Says Stamps. The sequins were individually chosen from the Cozy Sparkle Blends. One of the things I really love about Sparkle Blends is their versatility. Although each pack is themed, by choosing just some of the elements they can easily be transformed into something else. And accenting with them is another great way to use them. And although it’s hard to tell from the picture, I used a Clear Glitter Wink of Stella on the words to add some more sparkle. Thanks for checking it out! I’ll be back soon with more fun projects!

0

Look Who’s…blogging again!

Yes…it’s me! I’m back! It’s been longer than I care to admit. But I will admit this, social media has made me laaaaazzzzzyyyy. You know the drill. Post a pic. Run some filters. Witty hashtags. AND DONE! So needless to say the blog is left with chirping crickets. (The cute crickets. Not the nasty cave cricket that I found in my office tonight.)

So I have been creating and posting, just not here. Enter…awesome opportunity which requires me to blog (and awesome people who inspire me!) and now I have refreshed the blog and here I sit tapping away. So behold…craftiness!!! Oh, and as for the awesome opportunity with the awesome people…stay tuned!!!!

A special little boy is turning 2 next week and I had just got the Dino Days stamp set and papers in from Stampin’ Up. The paper is retiring so I got it on a sweet discount but the stamp set did carry over to the new catalog and is available for another year. There are dies for it but I did not splurge on those. And besides, I enjoy fussy cutting way too much. Although tonight I was a little tired and I told my husband I wished he could fussy cut. He said he could fuss AND cut, but nobody wants to hear that! The scalloped ovals are from Stampin’ Up and the “2” stamp was from a past Paper Pumpkin kit.

Cardstock is also Stampin’ Up. I have to say, their’s has always been my favorite. I’m always happy with the quality, choice of colors and how inks, papers, and everything else coordinate. Not to mention I have a stockpile of it.

And, since I had also just received another fun order in last night from Doodles Paper Playground, filled with a bunch of my favorite Sparkle Blends, it had to be a shaker card. Can you say “Covid Christmas!” (Well Amber from DPP said it and I stole it.) Although I ordered a bunch of new blends, I ended up using one of my favorites, “Grandma’s Knit Sweater.” Luckily, I had ordered a replacement pack because I was almost out. If you don’t own any Sparkle Blends, I suggest you leave my blog right now and head over to the store. You won’t be disappointed. Tell them the crazy, obsessed girl sent you! They’ll have no idea who you mean, because aren’t all us crafters obsessed with pretty thing?!?! I posted a second photo so you can see the blends spread out and appreciate their true beauty. I also hope you will appreciate my craftiness and come back and visit me again. There will be a lot more excitement coming up, I promise!